
- What preparation do I need to do before installing the driver?
It is recommended that you save a configuration or golden configuration before installing any driver.
- Honeywell Thermostats TCC / What is the “Instance Number” for and what should I put in?
The concept of the instance number is the same as how it’s used in the Crestron SIMPL HVAC Scheduler module. The instance number is used to create a unique filename on the processor so that it stores the token information needed to make requests. In normal circumstances you can leave it as one. You would need to change the instance number if the thermostats were paired to separate user accounts and you wanted to provide them access to thermostats from both accounts. An example of this is if the main house thermostats are paired to one user account and the guest house thermostats are paired to a separate user account. If you want thermostats from both properties to show up, you would need to add 2 instances of the platform driver, and each instance would need a unique instance number to work properly.
- Honeywell Thermostats TCC / Why do the drivers take an extended amount of time to load properly after a system reboot?
The delay in drivers loading is attributed to the platform driver, which requires a minimum of 20 seconds to establish its drivers following a system reboot. This duration is essential to ensure synchronization with the processor's readiness for optimal functionality.
- Honeywell Thermostats TCC / If I later add thermostats or replace thermostats, do I have to go through all these steps again (get auth code, delete driver, re-add)?
Unfortunately yes, if you add thermostats, you have to go through this process again. This is a security feature from Honeywell. The authorization only allows you access to the thermostats that have been allowed. Since the newly added thermostats were not allowed, the driver can’t get access to it. The process is similar to updating the driver. First, make sure you check the option to delete the configuration file in the driver’s Installer Setup option. Then uninstall the driver. If you don’t check the option to delete the configuration file, it will just pick up the old (now stale) authorization data and the new thermostat won’t show up. It’s recommended that you wait until all the thermostats have been installed before going through the process of getting them to work with this driver.
- Honeywell Thermostats TCC / If I upgrade the driver, do I have to go through the process of authorizing the thermostats?
Not necessarily, when you first install the driver and enter the authorization code, if it’s successful, it will create a config file on the processor. This config file will remain on the processor unless you manually remove it. When you install a new version of the driver, leave the authorization code empty and it will automatically pick up the file and use the information in there to make its request. It is important that the instance number matches the previous driver.
- Honeywell Thermostats TCC / The driver doesn’t create the paired drivers
Confirm that the credentials are correct and make sure the username do not have spaces or special characters like “+”, “,”, “;”.
- Honeywell Thermostats TCC / How come I am not getting the popup folder with the list of entries/zones to add to the individual room?
- Confirm that the credentials are correct
- Make sure the username or password doesn’t contain spaces or special characters like “+”, “,”, “;”.
If the driver still doesn't create the directory with the zone list, there are a few steps you can take to troubleshoot the issue:
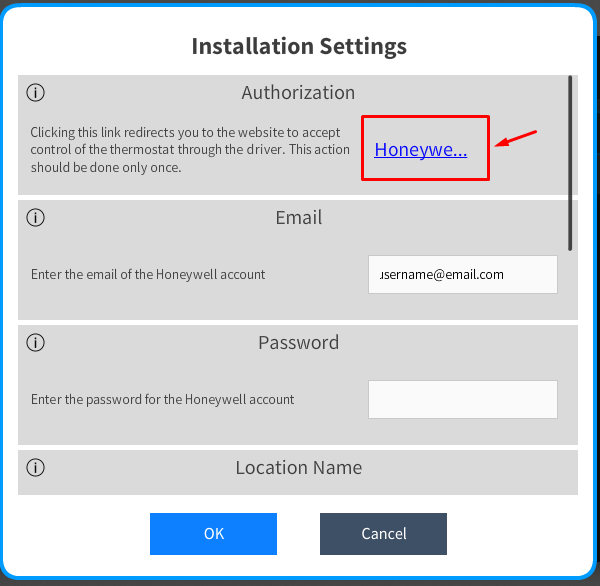
- To ensure correct directory creation, within the installer settings, there is a clickable link named "Authorization," which, when clicked, redirects to the Honeywell/Resideo website. It is necessary to accept the permissions by selecting the device(s) and clicking on the “OK” button, it will then redirect you to Digital Automation’s website. This authorization is required to be done once.
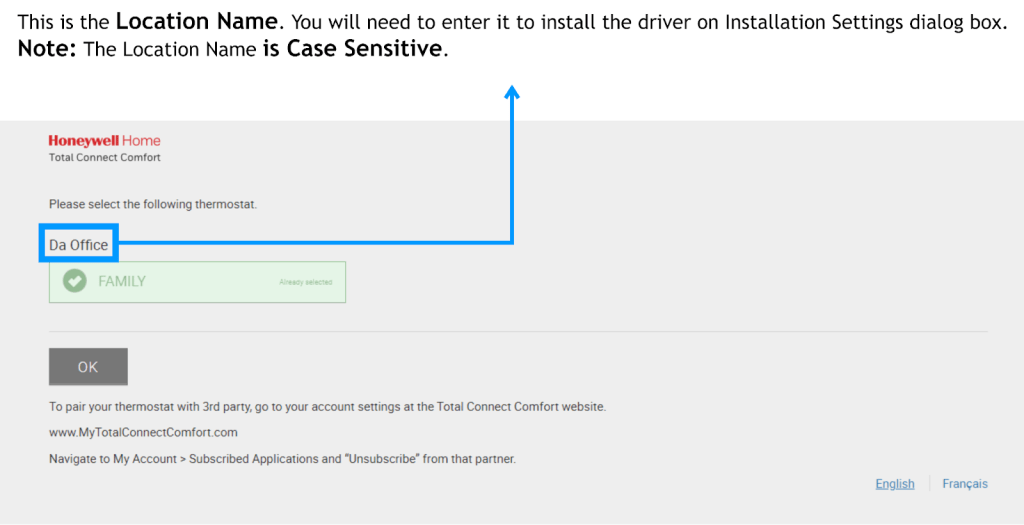
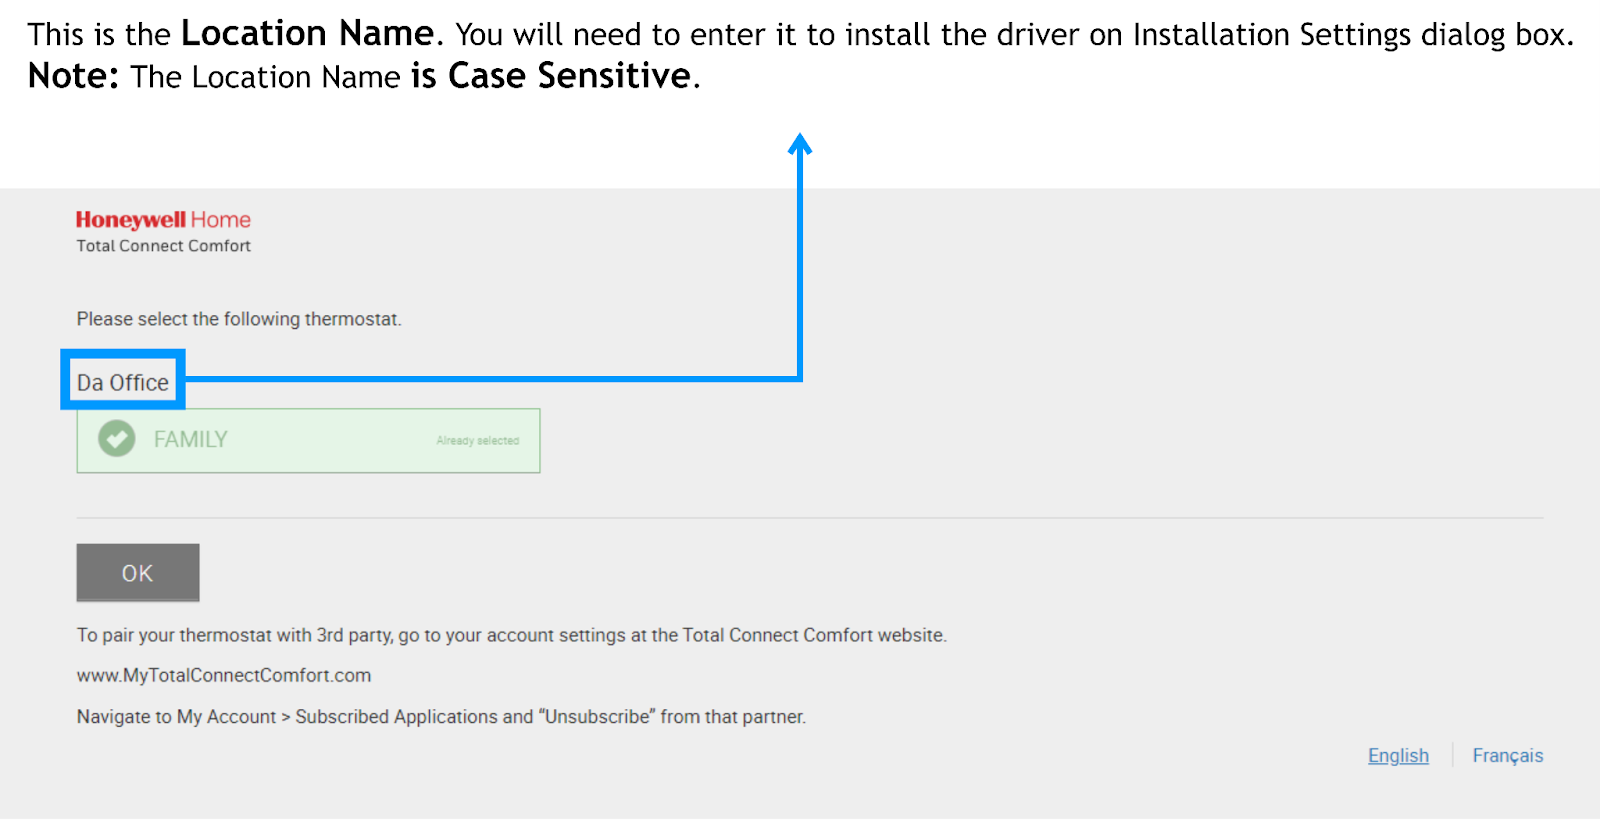
2. Verify the Location name by using the exact case-sensitive name used during the initial thermostat pairing with the user's Honeywell account, as the driver is sensitive to case and accuracy. You can use the Honeywell/Resideo web app or the authorization webpage to get the location name.
3. Allow time for communication: After adding the thermostat to a room, it's important to wait for a sufficient amount of time for the driver to establish communication with Honeywell’s service. In some cases (especially systems with a large number of thermostats), it may take at least 1 to 2 minutes for the driver to properly communicate and create the directory with the zones.
4. If the folder is still not showing up after all these steps, you may contact us via email. Please be prepared to provide the user’s account credentials to troubleshoot properly.
- Honeywell Thermostats TCC / I added new thermostats and they are paired to my account, how do I get them to show up in CH?
Unfortunately you need to uninstall the driver, taking care to make sure you check the option to the Delete the Configuration in the “Installer Settings” in the main platform driver. Than install the driver again using a new authorization code. The reason for this is a security feature on the manufacturer’s side. The existing authorization is paired with a specific set of devices and can not be updated dynamically. The only option is to generate a new authorization code that is paired with an updated list of devices. A word of warning, this will also delete all the quick actions associated with this driver.

Reviews
There are no reviews yet.